
How to to do home Fecal Testing
Doing you own fecal testing is not hard and it is a very useful skill to have in caring for your animals. There is an investment you must make in terms of supplies for this procedure, but these tools will pay for themselves very quickly since you will no longer have to take your fecal samples to a vet to find out if you have a worm problem.
- Photos of Parasite Eggs/Oocysts found in Sheep and Goats
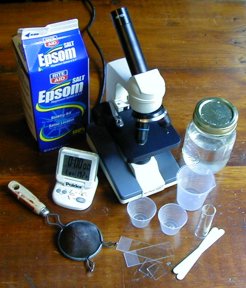
- Supplies needed to do your own fecal testing
- Step-by-step instruction how to run your own fecal tests
- Flotation Solution- How to make your own
- Other worm related
info:
- Wormers:
- General information
- A note about chemical wormers
- When to worm your goats
- Symptoms of worm infestation
- How worms build resistance
- List of Wormers use for goats and their dosage amounts
- Article: Worms: Misdirected Hysteria?, By Sue Reith
-
Article: Comparing Alternatives for Controlling Internal Parasites in Dairy Goat- Herbal vs. Chemical, By Crissy Orr
- Herbal Wormer: Holistic/Natural method of parasite control
- Wormers:
|
|
|
 |
How I run fecal tests on my goats:
I am very exacting and scientific about how I do things; I feel this is the only way to get accurate, consistent results. But, in my explanations on this site, I also always try to keep things very simple and understandable for everybody. The following is the procedure I follow when doing my own fecal tests. Remember,
always keep careful, accurate records. |
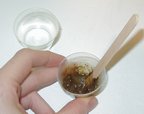 |
1) Collect fresh poops/manure/nanny berries/fecal sample, whatever you wish to call it, from the goat (or any other animal). 2) Weigh out 3 grams of poop. (I prefer to weigh the sample because you get much more consistent results. 3 grams is about 1/2-3/4 tsp.) 3) Put the poop in a small cup or beaker that can hold 30-50 ml and mash it up really well with the craft stick. 4) Slowly add, while stirring, 25ml of floatation solution. Stir well. 5) Let sit for 2 minutes. |
 |
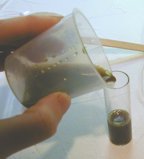
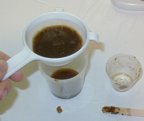
6) Strain poop solution into the larger cup or beaker. Press the poops really well to force as much liquid out as possible.
7) Let sit for 2 minutes. 8) Stir. |
|
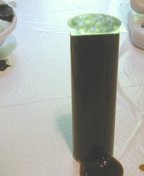
9) Set test
tube in the holder, and pour the solution into the tube. Fill
it a little more than full, so the solution overflows slightly
(the solution should kind of stand up higher than the top of the
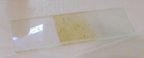
test tube.) (In the photos I am using a flat bottomed test tube called a "shell vial", just because that is what I have. These are harder to find and more expensive than real test tubes.) |
 |
10) Carefully place a coverslip on the test tube. The solution should touch the coverslip. 11) Let sit 15-20 minutes. The eggs will float to the top of the solution and collect on the coverslip. 12) Carefully remove the coverslip by lifting it straight up and place it (wet side down) on a slide.
|
|
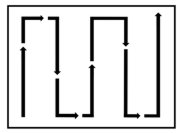
13) Place the slide on your microscope. At 10X power, find a corner of the cover slip to start at. 14) Search the slide by moving it slowly in an up and down pattern. It will be hard to get the hang of it at first, because moving the slide while looking in the microscope will be like looking in a mirror, when you want to move the slide right, you really move it left, when you want to go "up" and move the slide "down". You'll get the hang of it with a little practice. |
|
15) Start looking for worm eggs. You aren't actually going to see worms, just worm eggs. (except vary rarely you may see a lungworm worm). Every time you see a worm egg, make a mark on your paper. The eggs are small, so take your time and keep looking. You will see all sorts of stuff in the poop (it is very interesting), but eventually you will probably see a worm egg, and from then on, you will know what you are looking for. You may see lots of stuff that looks like worms, but remember that the goat eats lots of varied and fibrous plants and the cells of these can sometimes look long and wormlike. You are looking for oval shaped eggs. See photos below. If you locate, what you think is a worm egg, you can switch your microscope to 40X power to get a really good look. (Be careful using 40X power, and adjust the focus very slowly. When using 40X power the lens gets so close to the slide that you can accidentally break the slide with the lens, this isn't good for the slide or the microscope lens.) Note: There will be air bubbles, probably lots of bubbles, so don't mistake these for eggs. At first, you will probably think the bubbles are eggs, but air bubbles are perfectly round and have very dark edges and clearish and/or bright centers. Once you realize what they look like, you won't mistake the bubbles and eggs. When you are done, count the total marks you've made, this will be the total number of eggs you saw. Now, the big question, how many eggs can the goat have and be OK. How many mean an infestation? ALL GOATS HAVE SOME WORMS, so, do not panic if you find worm eggs in the sample, that is normal. There is no shame if your goat has worms. You just don't want lots of eggs. It's hard for me to tell you exactly what number is OK and what number of eggs is bad. Every situation is different. A healthy goat that has built up natural resistance to worms can handle a larger wormload than an unhealthy goat. The goal is not to have your goats be totally worm free, but just to maintain a consistent low wormload, with the goat showing no signs of parasite infestation. It this way, the goat builds natural resistance/immunity to worms. I do not worry about anything under 10 eggs. If I count in the teens, I still may not worry too much, depending on the health of the goat. If I counted over 20 eggs, I would probably treat the goat with a double dose of wormwood wormer for 3 days. When you are treating your animals with chemical wormers, it is standard procedure to identify the exact type of worm eggs, so that you are properly treating with the correct chemical wormer (different wormers kill different worms). But, since I use my own herbal wormer formula, which pretty much takes care of every type of worm, I don't get real technical or worry too much about exactly which type of worm each egg comes from, and just count the total eggs in each sample. If you are using chemical wormers, you may need to research further the different types of worms and eggs.
NOTE: Be aware that you cannot always see signs of LUNGWORMS in a fecal sample, due to the fact that mature Lungworms reside in the lungs and not the digestive system. Your goat may have Lungworm and it not show up in a fecal sample (done either by you at home or even at the vet). |
|


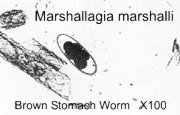
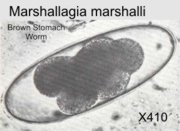
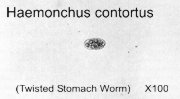
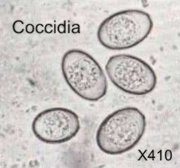
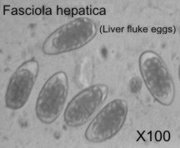
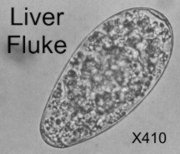
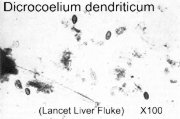
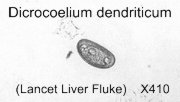
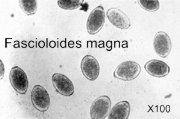
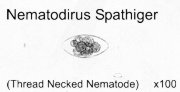
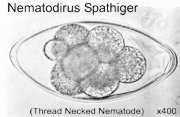
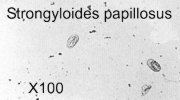
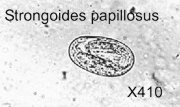
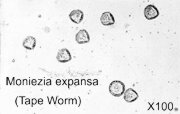
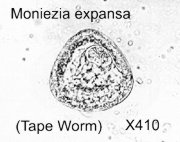
Parasite
Eggs/Oocysts found in Sheep and Goats |
||
scientific name: Marshallagia marshalli |
||
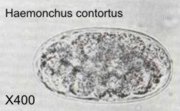
scientific name: Haemonchus contortus |
||
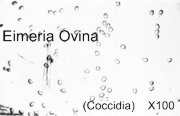
Notice they look like hard boiled eggs split in half, with the yolk clearly visible in the middle Note: Coccidia are about 1/4 the size of stomach worms. |
||
scientific name: Fasciola hepatica |
||
scientific name: Dicrocoelium dendriticum |
||
scientific name: Fascioloides magna |
||
scientific name: Nematodirus spathiger This worm can espacially hit older animals in particular when their immune systems start to wane. |
||
scientific name: Strongyloides papillosus |
||
scientific name: Moniezia expansa Note the pearl shaped embryo which contain 6 hooklets |
||
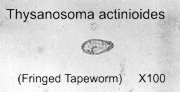
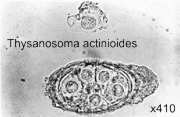
scientific name: Thysanosona actinioides These
eggs usually leave the host within the tapeworm segments, hense
are seldon found in fecal samples.
|
||
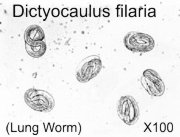
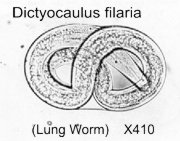
Lungworm Be aware when looking for Lungworm in a sample that these eggs are much heavier than the eggs of other species of worms. If your goat presents other symptoms of Lung Worm (such as a chronic dry cough) you can look specifically for Lungworm by adjusting the focus of your microscope as you search to look "deeper" into the various levels of the slide sample. All in all, these parasites are extremely hard to find in the feces, so it is best not to rely solely on a fecal sample (even when done by someone with a lot of fecal testing experience) to diagnose that your goat has Lungworm. |
||
| I'd like to thank Sue Reith for her help in correctly identifying these parasite photos and also thank you for supplying me with more photos to round out the collection. |

How to make your own floatation solution:
You are going to make a "saturated solution", which means you are going to put so much Epson Salt into some water that the water cannot take up any more. This will cause the water/Epson Salt solution to become heavier than just regular water, thus, the worm eggs will float to the surface of the solution during your test.
- Purchase some Epson Salt.
- Put some of the Epson Salt in a jar with a tight fitting lid. Fill about 2/3 full with water.
- Shake the jar well.
- Add more Epson Salt.
- Shake.
- Over a 24 hour period, keep adding more Epson Salt and shaking until you have a permanent layer of Epson Salt in the bottom of the jar. No more Epson Salt will dissolve in the water. You now have a saturated Epson Salt floatation solution. Pour off the solution into another jar, leaving behind the non-dissolved Epson Salt grains.